
Rooting Any Version of the Nook
Comrade cdump found a way to write an arbitrary file to a Nook of any version, including 1.4.1/1.4.2, which used to be considered unrootable. That means you can genuinely “localize” it – that is, load your own programs onto any device. A detailed writeup is up on mynook.ru, and I’ll try to describe here exactly how to do it at home.
Spoofing the update data
To root the device you need a WiFi network with internet access. At 217.20.163.111 I’ve hosted my own implementation of the scripts that mimic a B&N update. All you need to do is make sure that when the device checks for updates, it hits this server instead of sync.barnesandnoble.com and edmfiletransfer.barnesandnoble.com.
Setting it up on Windows
On Windows we won’t wade into the depths of the server Routing Services – instead we’ll use the TFTPD program. It can act as both a DHCP and a DNS server at the same time.
DHCP
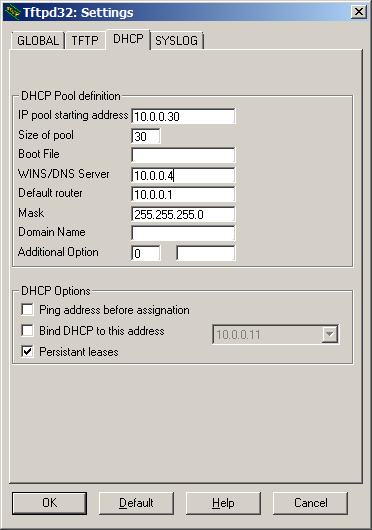 If you can set the server directly in your router’s DHCP settings, you can skip this part and go straight to the DNS setup. The process is very simple: launch TFTPD, click Settings, enable DHCP Server, and on the DHCP tab configure it roughly as shown in the screenshot. For IP Pool Starting Address, enter a free address on your network; for Size of pool, any number greater than 0; for WINS/DNS Server, your own computer’s address; and for Default router, your gateway’s address.
If everything’s set up correctly, the Nook will pick up an IP address from the specified pool the next time it connects to WiFi.
DNS
For the DNS server we use the same TFTPD. There’s nothing to configure – just check the DNS Server box. Then you need to edit the hosts file. It’s usually located in Windows\System32\Drivers\etc\hosts. Add these two lines to the end of the file:
217.20.163.111 sync.barnesandnoble.com
217.20.163.111 edmfiletransfer.barnesandnoble.com
Setting it up on Linux/Unix/MacOS X
Linux/Unix/MacOS X users can add this to their own DNS server, for example BIND. If you don’t know how to do that, you’re better off finding a Windows machine. Here’s a sample entry for named.conf:
zone "barnesandnoble.com" {
type master;
file "named.bn";
};
The named.bn file:
$TTL 86400
@ IN SOA barnesandnoble.com. root.barnesandnoble.com. (
 2 ; Serial
 28800 ; Refresh
 14400 ; Retry
 3600000 ; Expire
 86400 ) ; Minimum
@ IN NS barnesandnoble.com.
@ IN A 217.20.163.111
* IN A 217.20.163.111
@ IN AAAA ::1
The rooting procedure
The rest of the rooting procedure is pretty simple: you need to convince the device to check for updates. For me this only worked after registering the device through My Library – and note that registration has to be done with a normal DNS server, not the spoofed one. After that, tapping Check for new B&N Content brought up an entry called Don’t Blink dated September 29th (in reality that entry is being served from my server, not B&N’s), and the update download started, immediately followed by an Error downloading update message. That error is perfectly normal – nothing to worry about. Once WiFi is turned off, the device’s own script runs and roots it – launching adbd.
What’s next?
With adbd running, you can connect to the device over WiFi via adb and do whatever you want with it. If that means nothing to you, or you don’t feel like dealing with adb and manually installing programs, there’s an alternative. Besides launching adbd, the script also runs a file called root.sh, if present. That file needs to sit on the internal card next to the my documents folder and the others. It’s easy enough to make this file install the programs you want, change settings, or even turn the system into the equivalent of the Mynook.ru firmware. That’s exactly the kind of package available through the link below – it was built by diffing two firmware images and writing out all the missing files.
installs the launcher from Mynook.ru;installs the Nookdevs library;installs NookFileManager;installs FBReader;replaces Home.apk with the patched version from Mynook;replaces Browser.apk with a patched version;removes FirmwareUpdateService.apk;writes a correct wifi_stop.sh;installs busybox;allows installing third-party apps;enables adbd to launch at startup;
The package is available at this link: http://runserver.net/nook/mynook_package.zip
To install it, connect the Nook over USB before rooting and unpack the archive’s contents (3 files) into the root of the device’s main drive (next to the my documents folder and others). During rooting, after you turn off WiFi, wait a bit and the device will reboot on its own. Once it comes back up, you’ll have an alternative launcher, a bookshelf with FB2 support, and the ability to install programs via NookFileManager.
Originally published 2010-10-16.